Monday, December 22, 2014

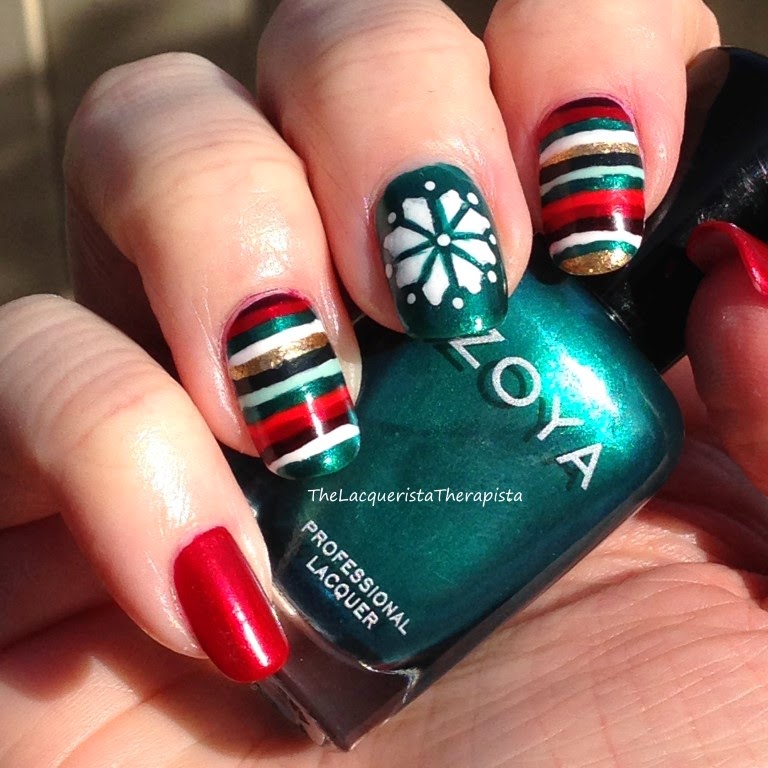
Holiday Stripes (and "Ugly" Christmas Sweater)

Happy Holidays!! Merry Christmas, Happy Hanukkah, Happy Solstice, and Happy Festivus! It's almost time for the airing of grievances. Always a frothy, lighthearted time.

I was inspired by another nail artist for this mani. @iheart_nails_ did a great stripey mani for Christmas and I fell in love with the idea.

This year, I've been having fun changing up the traditional red and green color scheme so I opted for a teal color instead of straight green. Teal is always a good choice.

holiday; stripes; ugly sweater; cats; red; teal; christmas; cat; sweater; mani; nail art
Holiday stripes and "ugly sweater" nail with cats! (shade)

holiday; stripes; ugly sweater; cats; red; teal; christmas; cat; sweater; mani; nail art
Closer look...tiny kitties! (shade)

Right hand (shade)

holiday; stripes; ugly sweater; cats; red; teal; christmas; cat; sweater; mani; nail art
Direct sun
holiday; stripes; ugly sweater; cats; red; teal; christmas
Direct sun (right hand)

This mani took an inordinate amount of time. The stripes were the most tedious thing. For the stripes, I used a long, thin striping brush and a piece of paper as a surface on which to drip polish. This is what said paper looked like when I was done:

So many colors

The ugly sweater design nails were far less tedious. For the cat nail, I used a dotting tool and a striping brush. For the snowflake nail (is it a snowflake?), I used thin nail tape, a small brush, and a dotting tool. Honestly, the snowflake didn't turn out as sharp as I'd like, but I'll live. I originally tried some stamping with an ugly Christmas sweater stamping plate by Vivid Lacquer (VL 035). While, it was cute, it lacked the oomph I wanted for this mani.

Original plan for the snowflake nail. The stamp is cute, but not vibrant enough in this mani for my taste. Never mind the hideous stains on my skin.

And for the cat nail, I originally used a reindeer stamp from the same Vivid Lacquer plate. Also super cute, but I just wasn't feeling it at the time; it needed more cats.

Original cat nail wasn't cats. Decided it needed more cats so I re-did it.

Perhaps if I didn't redo my nails when slightly displeased, these things wouldn't take quite as long, but then I'd forever be curious about what could have been. I'm very...particular, let's say.

I'm really pleased with the color combo. I love how the red and teal look together. This red, Zoya Elisa, is my favorite holiday red. To me, it just screams "I'M SO FESTIVE!!" I used a total of 8 polishes for this mani:

Zoya - Elisa (red)
Zoya - Giovanna (teal)
Zoya - Purity (white)
Zoya - Ziv (gold)
Butter London - Abso-bloody-lutely (oxblood red)
OPI - Live and Let Die (dark green)
Bongo - Mint Chip Madness (mint green)
China Glaze - Roguish Red (orange red)

Here is the instagram for @iheart_nails_. Thank you for the inspiration!

I hope everyone has a wonderful holiday season full of peace, love, and merriment! Thanks for reading!

-Melissa


All polishes and products used in this post are from my collection and were not provided for review.


Sunday, December 7, 2014

Ugly Christmas Sweater Nails

Ugly Christmas sweaters are all the rage right now. Seems like you can purchase them anywhere, not just at the second-hand store or by raiding your mother's or grandmother's closets for sweaters from yesteryear. These sweaters have become one of my favorite parts about Christmas these days so why not have them on your nails, too?


I free-handed each nail for this (well, except for a little tape on the middle finger to help make the snowflake lines a little straighter). It's actually from last Christmas, but I hadn't started blogging yet. Couldn't let these go unblogged! 


ugly Christmas sweater, Zoya, festive, holidays, freehand
Ugly Christmas Sweater nails

I wave my crazy cat lady flag high and proud as you can see on my ring finger. Cat-themed Christmas sweaters are my favorite.


ugly Christmas sweater, Zoya, festive, holidays, freehand
Ugly Christmas Sweater nails

I did both hands. Same designs on each hand. Please excuse the awkward claw-like photo below... 


Ugly Christmas Sweater, holidays, Zoya, nail art
Ugly Christmas Sweater nails - Both hands

As you may suspect, this was incredibly time consuming, but so much fun. I think it might be interesting to do another free-hand ugly Christmas sweater mani this year for comparison. On the other hand, I just got a new stamping plate with Christmas sweater designs on it. Might opt for convenience this year. We'll see.

Thanks for reading!
-Melissa


Monday, November 10, 2014

Cranberries!

Oh, my life is changing every day...ahem (song reference...guess which?)...Can anyone believe how fast the holidays come round? They really seem to arrive faster every year. As my favorite food-themed holiday looms, I felt inspired to make something, well, food themed-ish. One of my favorite Thanksgiving foods is cranberry sauce, both homemade and canned, but especially canned (drool). The actual berries are so rich in color and the reds vary a bit...as does my selection of red nail polish.


Delightfully red cranberries!
Source: Stock photo


And here it is...cranberry nail art! And some other color coordinated nail art, too. I have a difficult time doing the same thing on each nail (because there are so many options!!) so only my middle and ring fingers were intended to be cranberry-inspired.


cranberries;Thanksgiving;nail art;dotticure;stripes;dots
Indoor lighting


To create the cranberry look, I used a dotting tool with 5 different red polishes (listed below). Dots were layered in varying shades until the whole nail was covered. I loved how the reds looked together so I chose to use them in different ways on my other fingers. Index and pinkie were done with a dotting tool and a striping brush. Thumb is free-handed stripes with a striping brush.


cranberries;Thanksgiving;nail art;dotticure;stripes;dots
Outdoors (no sun)


cranberries;Thanksgiving;nail art;dotticure;stripes;dots
Outdoors (no sun)


This is one of those manis that I had a half-baked idea of what I wanted to do and really didn't expect it to turn out too cohesively, but I think it worked out well. Now about that canned cranberry sauce...

How about some other holiday nail art? Have any ideas? Comment below.

Thanks for reading!


Polishes used:
Zoya - Rue (nude)
butter LONDON - Abso-bloody-lutely (oxblood red)
OPI - Skyfall (wine red)
China Glaze - Ruby Pumps (red glitter)
Zoya - Sooki (true red)
China Glaze - Roguish Red (orange red)


Monday, October 13, 2014

Tutorial for Muted Mondrian Mani

A friend requested a tutorial for my Muted Mondrian Mani. I did my best to recreate it in pictorial form.

This is everything I used for this mani:

From left: Orly Bonder (base coat), Seche Vite (top coat), Essie - Sand Tropez, Zoya - Natty, Hits - Bardana, Nails Inc. - Hampstead Gardens, and Orly Instant Artist in Black. I also have an angled brush from the Bundle Monster brush set, acetone, a small ceramic bowl for the acetone, and an angled E.L.F. brush for clean up.

Start with a clean nail...


Apply basecoat (not shown), let dry, and then apply two coats of your base color. In this case, it's Essie - Sand Tropez.


Next, draw your lines using Orly Instant Artist in black.


However you want it to look will do. If you don't have Orly Instant Artist (or similar nail art polish), I recommend using a striping brush and whatever polish you'd like. The striping brush makes it really easy to make decently straight lines. Here's what the Orly Instant Artist brush looks like (which is what a regular striping brush looks like):


Long and thin brushes make striping pretty easy

Now it's time to begin filling in the rectangles. I put a dab of each color on a piece of paper and then use my angled brush to fill in the rectangle. Use any brush that works for you. It doesn't have to be angled; I'm just feeling fancy. Do your best to stay in the lines, but if you overlap a little, it's okay, we'll fix it later.


Of course, be sure to clean your brush with acetone between each color.


One layer of each color

Add a second layer of the colors to fill in any thin spots if needed...

Lots of overlap on the black rectangle lines

Go over the black rectangle lines with Orly Instant Artist (or equivalent) to crisp up the lines. It's okay if it looks a bit lumpy (like mine).


I like to clean up around the edges before applying top coat. For this, I use an angled eyeshadow brush like this one from E.L.F.:


Apply top coat and everything smooths out and looks miraculously lovely:


Do your other nails and admire your hard work:


Apologies for the crap lighting


Was this tutorial helpful? Questions? Ideas? Comment below and I'll do my best to help! 


Thanks for reading!


All polishes used in this post are my own.


Sunday, September 14, 2014

Muted Mondrian-Inspired Mani (with a coordinating fan brush mani on the non-dom. hand)

I have another art-inspired mani for you this week from another Dutch painter, no less. This one is a request from a friend and it was so much fun to paint this one. I chose to do a variation on the famous geometric paintings by Piet Mondrian.


Mondrian-style art (stock photo)

Despite the horrifically hot weather (it's over 100 degrees today...oyyy), I'm ready for Fall to begin so I thought I'd try to usher it in by using colors that remind me of the season while still keeping to the red, yellow, blue vibe of Mondrian's art.


Mondrian; nail art; fall colors
Muted Mondrian mani. And the thermometer is chillin' (ha) between 100 and 110. Awesome.

Finding the best light source to most accurately represent the colors can be difficult. I'm not gonna lie, the next photo was taken in the refrigerator. There's good lighting in there! (Plus it helps neutralize my lobstery-red fingers with its bluish LED awesomeness)

Mondrian; nail art; fall colors
Indoor lighting

The following photo was not taken in the refrigerator.


Mondrian; nail art; fall colors
Direct sun

The base color is Essie - Sand Tropez. I also used Zoya - Natty, Nails Inc. - Hampstead Gardens, and Hits - Bardana. The lines were made with a black nail art polish by Orly.


For my right hand, I wanted to do something that would look decent with my left hand, but wouldn't take as much time to accomplish. This is what resulted: 


Fan Brush, nail art, french tip, fall colors
Refrigerator lighting

I really love how it turned out. It coordinates with the colors of the Mondrian-inspired side and also opposes it with its messy colors and angled lines. I used the same polishes for this one. The smeary look is done with a fan brush. I added angled tips to finish it off.  


I'm really enjoying these artist-inspired nail art designs. I wonder what to try next....


Thanks for reading!!


All polishes used in this post are my own.


Saturday, September 6, 2014

Starry Night

I love having fun with my manis and if I have the time, rest assured I will do my best to make it elaborate. Tiny paint brushes seem to be my tool of choice lately so I decided to try my hand at an oft-replicated (imitated?) piece of art -- Van Gogh's Starry Night.

Starry Night - Van Gogh


I have zero experience painting anything but my nails so this was a challenge for me. And I like challenges.


Van Gogh; Starry Night; nail art; impressionist
Direct sun (looks super bright...I think Blogger is messing with my colors)

Van Gogh; Starry Night; nail art; impressionist
Indirect sun

Van Gogh; Starry Night; nail art; impressionist
Thumb detail


I'm really happy with how this turned out. It's not perfect, but that's okay. It's my interpretation. :) This is one of those manis that I'd like to revisit sometime to work on improving. Maybe some painting lessons along the way just for fun.

BONUS! WOOHOO! I didn't want to do the same thing on my right hand (was getting tired) so I opted for a vertical gradient using the same colors. I'm not sure how I feel about it, but at least it coordinates with my left hand (and didn't take hours to accomplish). 


gradient; nail art


I'd love to try my hand (ha!) at something you'd like to see. Any requests for particular artwork? 

Thanks for reading!


Sunday, August 24, 2014

Nails for Doctor Who Series 8 Premiere

I'm a Doctor Who fan and yesterday (Aug. 23) was a very exciting day with the Series 8 premiere. YAY!


But, alas, I'm in the U.S. and do not have BBC America so I have to wait for it on Hulu. Despite the wait, I felt it necessary for my nails to reflect my excitement. This is most certainly my most detailed mani ever and it was so much fun to do!

DoctorWho;TARDIS;Dalek;Galaxy


Left hand: All four doctors from the new series (from left 12th: Capaldi, 11th: Smith, 10th: Tennant; 9th: Eccleston) and the TARDIS. Is it weird I have the chests of 4 different men on my nails?

12th, 11th, 10th, and 9th Doctors - sun

12th, 11th, 10th, and 9th Doctors - indirect sun

12th, 11th, 10th, and 9th Doctors with the TARDIS

I am especially proud of the 'Police Box' lettering on the TARDIS. It's not perfect, but it's legible! Success.

TARDIS;DOCTORWHO


Right hand: Galaxy nails, a Dalek, a Cyberman, and the Union Jack. Painted with my non-dominant hand. My left hand skills seem to be improving, but it's still so awkward. The Cyberman isn't my favorite, but it'll do. I love how the Dalek turned out. Exterminate!

Dalek;Cybermen;galaxy;doctorwho

Dalek;Cybermen;galaxy;doctorwho


So this took me an obscene amount of time to complete...cough...5 hours...cough.

What?!

The doctors took an especially long time as I wasn't completely sure how I was going to accomplish them until I actually started. I love how they turned out. The 5 hours was totally worth it in the end and now I can wave my nerd flag high and proud.

I used 21 different polishes and black and white acrylic paint, also striping tape and rhinestones to complete this mani. I don't ever want to take it off and I can't stop staring at them. Now to watch some more Doctor Who!

Happy Dance!


Thanks for reading! Anyone else do Doctor Who nails for the premiere? I'd love to see!